^ Module 2 - Fundamentals
Counter App - Part 2 Introducing Services ( 6 of 7 )
< Counter App - Part 1 Communicating between Components Counter App - Part 3 Introducing Angular Http Client >
Overview
Time: 5 min
Services perform a number of key roles in Angular development.
There are many benefits of using services:
- Services are great for code reuse. When you have multiple components that all need to access the same logic, access the same data or that all to make the same external HTTP request - a service is an ideal solution.
- Services keep the component lean and focused on supporting the view rather than also housing the logic to call the backend.
- Services make it easier to write unit test components. A mock service can be injected rather than the service that calls the real backend.
In a real application, your data will be retrieved from your backend using a service.
We are going to update the counter app to retrieve the initial value of currentCount from a service, rather than just initialising it to 0 in the CounterComponent.
It may seem like overkill to call a service to get back one number, but there are many things to learn regarding Angular services and we want to keep it simple at first.
In this module, we will learn about core Angular service principles and the dependency injection system. In another module, we will introduce Angular's HTTP module for calling external services.
Learning Outcomes: (What we want to know/understand)
- Understand the basics of Angular dependency injection
- Understand working with services and retrieving data
- Learn how to implement dependency injection in Angular
- Learn how to create services
- Learn how to register a service with Angular providers
- Learn how to inject services into a component with a Typescript constructor function
- Learn how to create a service to get data or share logic between different parts of an application
Open the completed Counter Exercise #1 code
Time: 5 min
We will continue on from the Counter Exercise #1 module and replace out the hardcoded counterValue in the <counter></counter> with a value we retrieve from a service.
Open up the completed code from part one
Understanding Angular services and dependency injection
Time: 15 min
Dependency injection is baked into Angular out of the box and Angular's dependency injection system is designed to be very flexible and powerful.
Although we could "new up" a TypeScript service class new YourService() this is a bad idea for many reasons - we should be injecting the service into the component.
Read this post on Stack Overflow to get an idea of dependency injection if you are not familiar with it. The canonical reference is 'Dependency Injection' by Mark Seeman and is considered a must-read.
@angular/core services are singletons by default. This means that if multiple components all have a reference to a service, then all of the components will have a reference to the same ONE INSTANCE of that service.. they all don't get a new instance of the service.
When you inject a service into multiple components the injector will give you the same instance of that service. This is very powerful as it allows you to share a value (or values) around your application by caching it in that service.
So the fact that Angular's services are singletons is very important.
The second important concept to understand is that you can register services with Angular providers at multiple levels in your component tree and that all of the children of that component you register the service with will have access to the service without having to register it again.
You will still need to import and add the service into the child component constructor though.
As a rule, you should always register the service at the topmost component in your component tree that needs the service, but not in your main.bootstrap which is intended for configuring and overriding Angular's own preregistered services, such as its routing support.
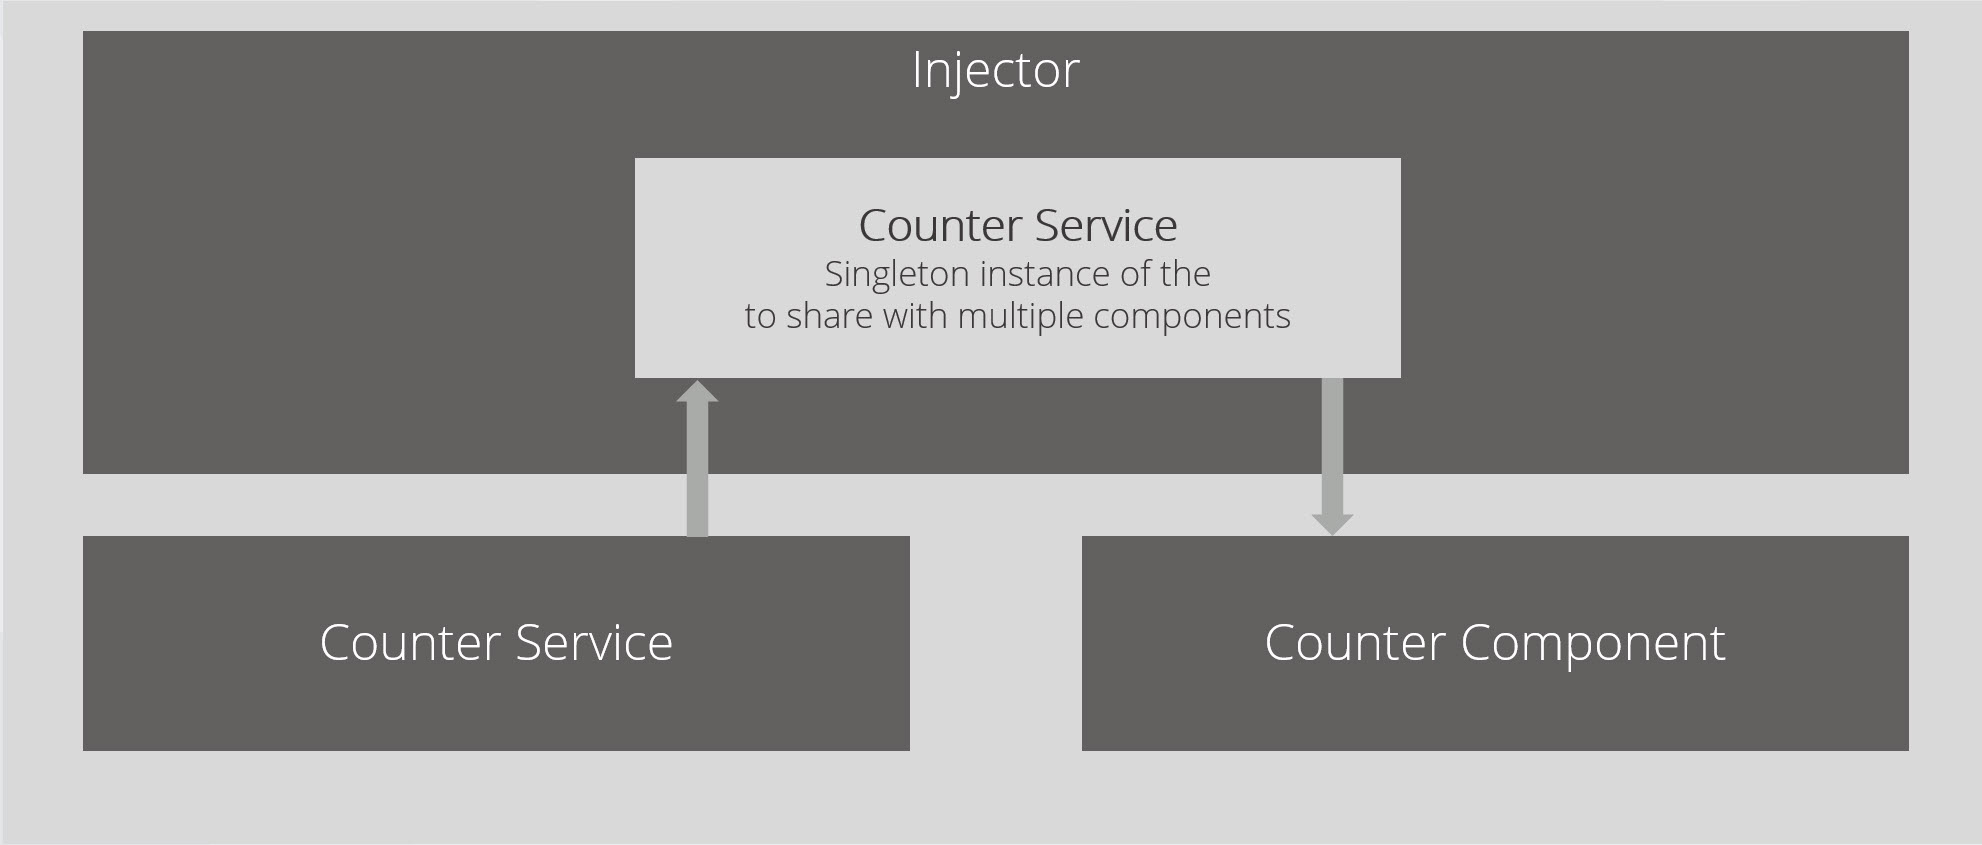
Figure: Angular dependency system and injector

Figure: Angular dependency system and injector showing the counter service being only available in the component it is injected into and it children
Create a service
Time: 5 min
Naming anything is hard and a great thing about Angular is that a naming convention best practice is already being followed. So here are a few tips to naming a service based on the Angular Style Guide:
1. Give it a clear name like "Counter"
2. Use a suffix of ".service"
3. Use Pascal case (Uppercase first Letter) for the service class name
4. Use Kebab case (lower case separated by a dash) for the file name
With good naming in mind making a new file in the counter folder called "counter.service.ts".
Tip: We could put the service in a shared "services" folder if we think that it will be used in more than this one feature.
A better approach, however, is to group your code modules by feature. We will put all the components and services we need for a feature under one Angular Module.
As you progress to building larger, more complex apps you can then use async routing features.
This means that instead of downloading all the code for the whole application when the first component loads, the code is downloaded as the user navigates between Angular Modules.
- Add the minimum code to create a blank counter service
import { Injectable } from '@angular/core';

@Injectable()
export class CounterService {

}
- You will notice that just like a component, the service is simply a TypeScript class. Instead of a @Component decorator though, it has a @Injectable decorator.
- In particular the
@Injectablelets Angular know to include any injected dependencies of this service when this service is injected into another component or service. - Next, add a simple function to the service to return a value of five which we can call from our component.
import { Injectable } from '@angular/core';

@Injectable()
export class CounterService {

      getCount() {
          return 5;
      }
}
CounterComponent: Register the service with Angular
Time: 15 min
As mentioned earlier it is best to register the service at the highest level component that will need the service.
In our simple application, we will register it in the AppModule.
To register a service we need to add it into the provider's section of our AppModule.
providers: [CounterService],
A provider provides the concrete, runtime version of a dependency value.
The injector relies on providers to create instances of the services that the injector injects into components and other services.
The updated CounterComponent is shown below:
@Component({
    selector: 'counter',
    styles: [`div { border: solid 1px blue; margin: 10px; padding: 10px; }`],
    template: `
        <div>
            <h2>Counter Component</h2>
            <p>Count: {{currentValue}}</p>
            <counter-logic [counterValue]="currentValue" (counterChanged)="updateCurrentCount($event)"></counter-logic>
        </div>
        `
})
Inject the service into the components constructor
Time: 15 min
- After we have registered the service with Angular we need to do two more steps in the counter component to be able to use the service.
-
We need to import the service
-
We need to inject the service in the
CounterComponentclass and initialise it to a private variable.TIP: Constructors are for instantiating components, ngOnInit is for loading data from services after the component has been created.
Do not call services in the constructor - instead, use lifecycle hooks (like ngOnInit).
This also makes writing tests easier as you will not need to mock these items in the service.-
This is recommended best practice from the Angular team.
-
To import the service add the following code:
-
    constructor(private counterService: CounterService) {

    }
Here we initialise a counterService variable to be an instance of our counter service provided by the Angular injector and set its type to be of : CounterService.
- Now we have registered, imported and injected the service we need to make a function to call the service and get the value and update the
currentValueproperty
getCurrentValue() {
    this.currentValue = this.counterService.getCount();
}
-
We need to call this function when we first instantiate the component.
To do this we will make use of Angular's lifecycle hooks. -
Import the
OnInitclass from @angular/core
import { Component, OnInit } from '@angular/core';
- Extend the CounterComponent class to implement OnInit. The OnInit method is one of many lifecycle hooks. It tells Angular to execute the code in the ngOnInit method when the component is instantiated.
Careful of the spelling and casing onngOnInit(){}or Angular will think it is a normal function and it will not run on component load, however, TypeScript will show an error.
export class CounterComponent implements OnInit {
    currentValue: number = 0

    constructor(private counterService: CounterService) { }

    ngOnInit() {

    }

    //removed
- Call the service to initialise the currentValue property in ngOnInit
    ngOnInit() {
        this.getCurrentValue();
    }
- The final code for our counter component will look like below
import { Component, OnInit } from '@angular/core';
import { CounterLogicComponent } from './counter-logic.component';
import { CounterService } from './counter.service';

@Component({
    selector: 'counter',
    template: `
            <p>Count: {{currentValue}}</p>
            <counter-logic [counterValue]="currentValue" (counterChanged)="updateCurrentCount($event)"></counter-logic>
        `
})
export class CounterComponent implements OnInit {
    currentValue: number = 0

    constructor(private counterService: CounterService) { }

    ngOnInit() {
        this.getCurrentValue();
    }

    updateCurrentCount(currentCount: number) {
        this.currentValue = currentCount;
    }

    getCurrentValue() {
        this.currentValue = this.counterService.getCount();
    }

}
Summary
Time: 5 min
- We learnt about using a naming convention
- We should always use the @Injectable() decorator
- We should register the app at the level it is needed or use a common ancestor component
- We learnt how to register the service with a provider
- We learnt the basics of Angular dependency injection system and how the injector makes singletons of our services
- We learnt about life cycle hooks
- We learnt about a whole bag of best practices
In the another module we will refactor the service to call a real backend and that's the beauty of removing data access from the component. We can change our minds about the implementation as often as we like, for whatever reason, without touching any of the components that use the service.